Firing Pin, Roller and Extractor Installation Instructions

How to install replacement firing pins in a CZ-52 pistol:

WARNING! WARNING! WARNING! WARNING!

Warning — Installing a different firing pin, other than the FACTORY replacement OR the Harrington Products CZ-52-1 will
DISABLE THE FIRING PIN SAFETY.

Warning! The Harrington CZ-52-2, CZ-52-3 and CZ-50/70-2 firing pin kits effectively disable the firing pin block safety. Instead we use a spring return to retract the firing pin. If the decocker on your CZ-52 is defective (and many are... do the pencil test — put a pencil into the barrel and activate the decocker — if the pencil moves at all, the decocker is basically a trigger!), installing these firing pin kits may increase the chance of a negligent discharge (this is no such thing as an "accidental" discharge). If you do not feel comfortable with this idea, please do not install this kit in your pistol.

BE CAREFUL PLEASE!!!

WARNING! WARNING! WARNING! WARNING!

Step-By-Step Installation Instructions

The following shows how to replace the firing pin, extractor, and rollers with Harrington Products upgrades. If you are only upgrading some of your parts, use the appropriate steps of the following. Refer to the ČZ-52 exploded diagram for details.

1. Verify that the pistol is unloaded

Remove the magazine and verify that the chamber is empty.

It sounds trite, but please be extremely careful and make certain that the weapon is unloaded.

Lock the CZ-52 slide back and verify that the chamber is empty and the weapon is unloaded.

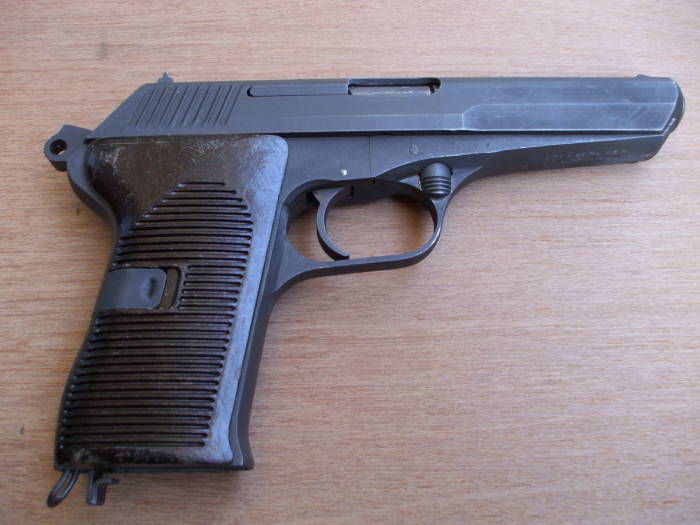
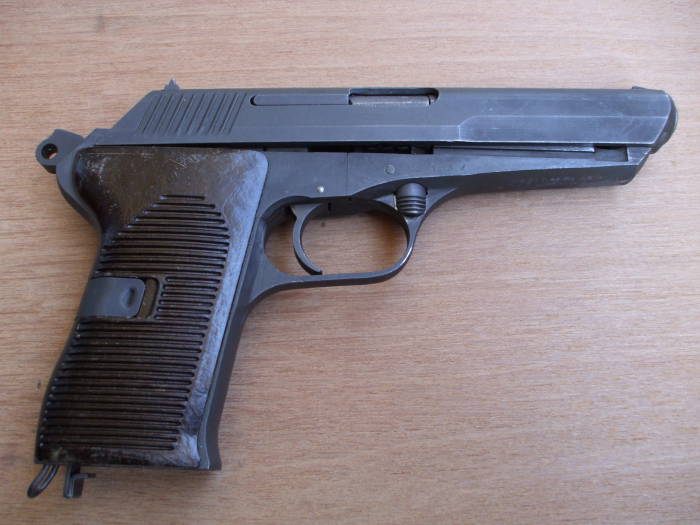
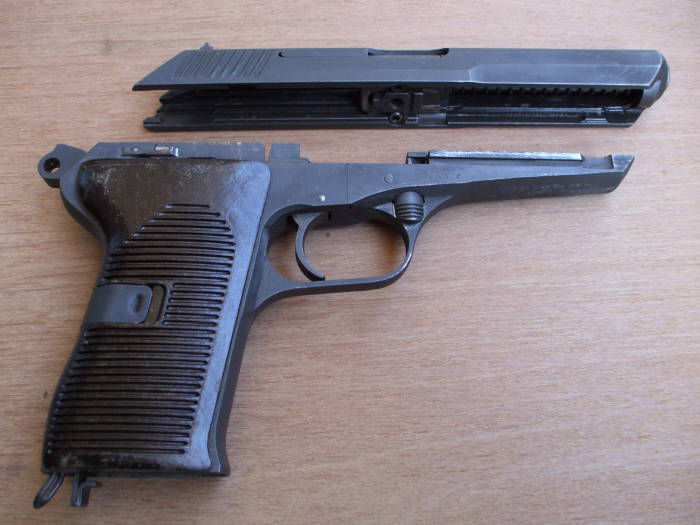
2. Remove the slide from the frame

While pulling back only slightly on the slide, pull the takedown latch down.

The slide can now be lifted forward and off the frame, as shown below.

Release the CZ-52 slide from the frame.

3. Remove the barrel from the slide (if replacing rollers)

The barrel, recoil spring, roller cam and rollers are all assembled into the slide.

This must be disassembled if the rollers are to be replaced with Harrington Products hardened rollers.

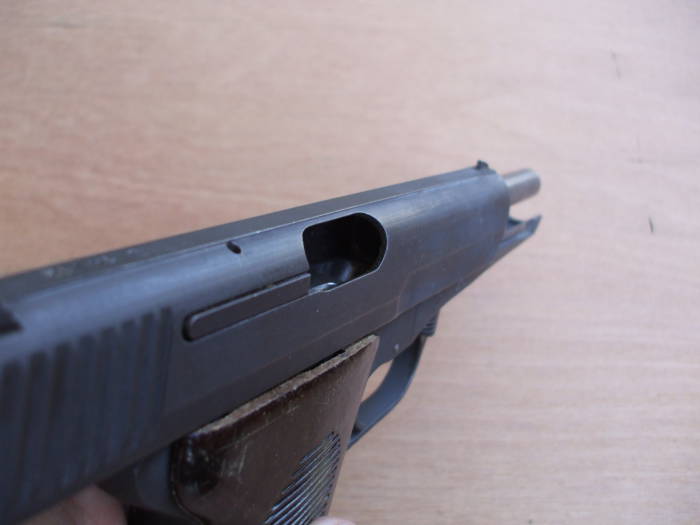
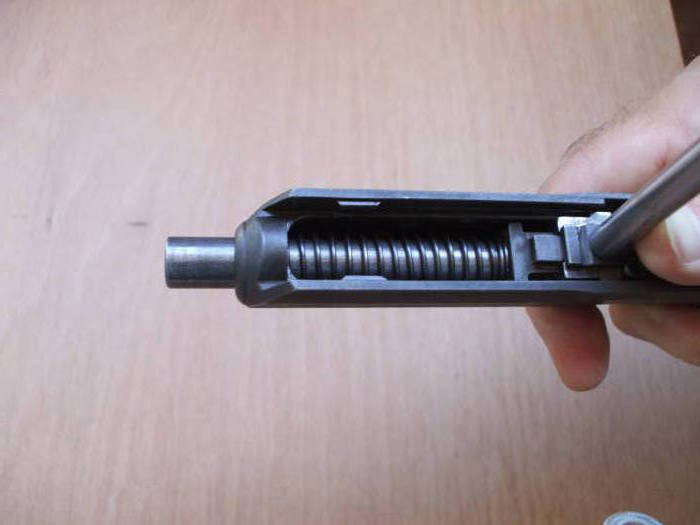
Here you see the slide assembly from the bottom. The muzzle is at the top, the hammer will be at the bottom.

Examine the CZ-52 slide assembly before disassembly.

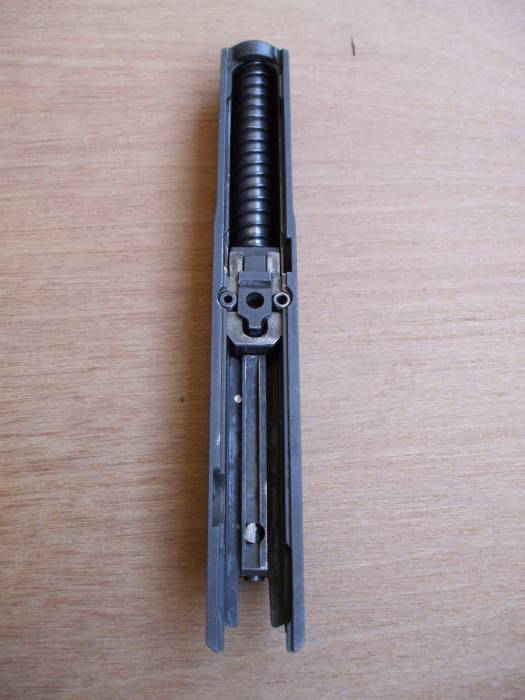
The original CZ-52 user's manual said to use the forward lip of the floor plate of the magazine to remove the barrel by using that lip to pull on the slot in the barrel just forward of the rollers. This is why CZ-52 magazines often have bent floor plates!

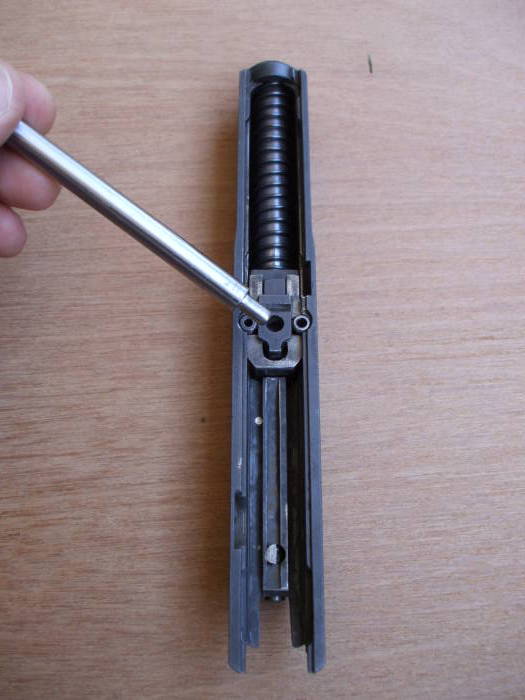
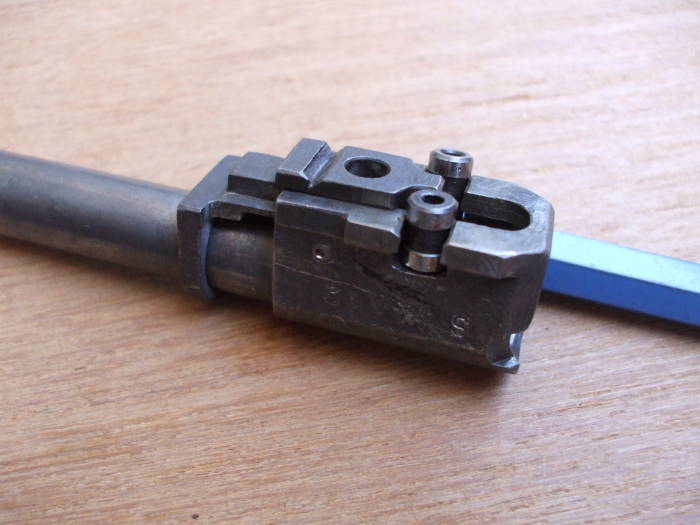
Here you see a Harrington Products barrel tool about to be inserted in the hole at the rear of the barrel's chamber block. A 1/8" or 3/16" punch could be used as a substitute, but this specially designed tool makes this easy.

Use the barrel take-down tool to compress the recoil spring and move the barrel forward.

Remove the CZ-52 barrel from the slide.

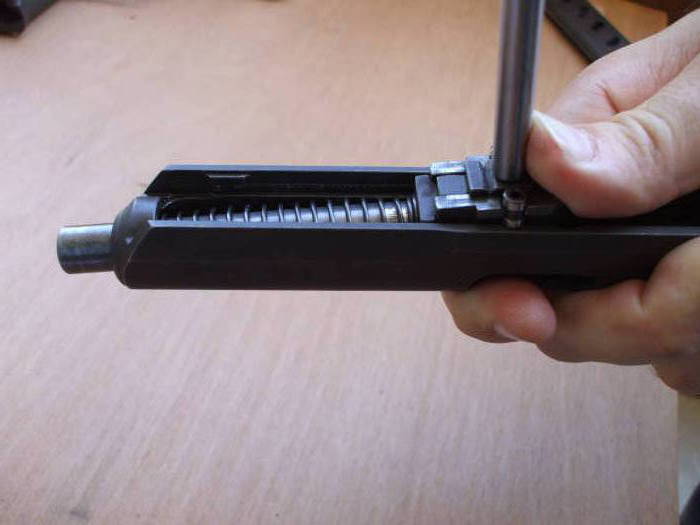
When the rollers have moved far enough forward, the rear of the barrel can be lifted out of the slide.

This is where a specially designed take-down tool is very helpful.

The recoil spring is compressed well beyond its normal range. Without the proper tool there is a very good chance that you might launch either the barrel or the slide across the room!

Remove the CZ-52 barrel from the slide.

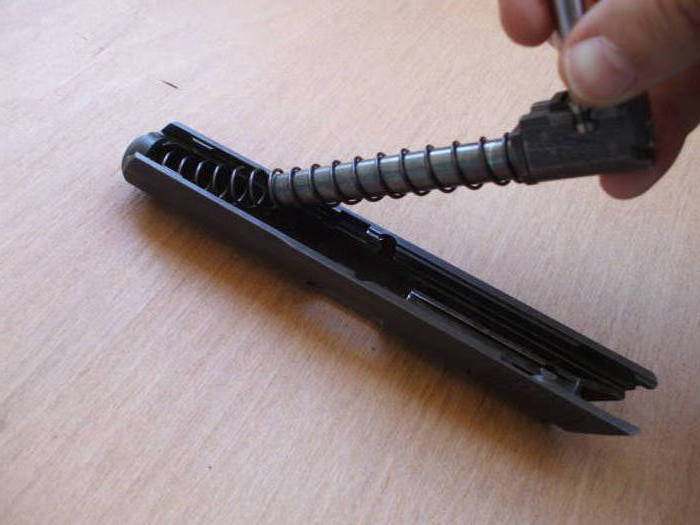
Remove the barrel from the slide.

4. Replace the rollers

Do this if you are going to replace your rollers with Harrington Products' hardened rollers.

Here you see the barrel with the roller cam fully to the rear.

The CZ-52 roller cam is fully to the rear.

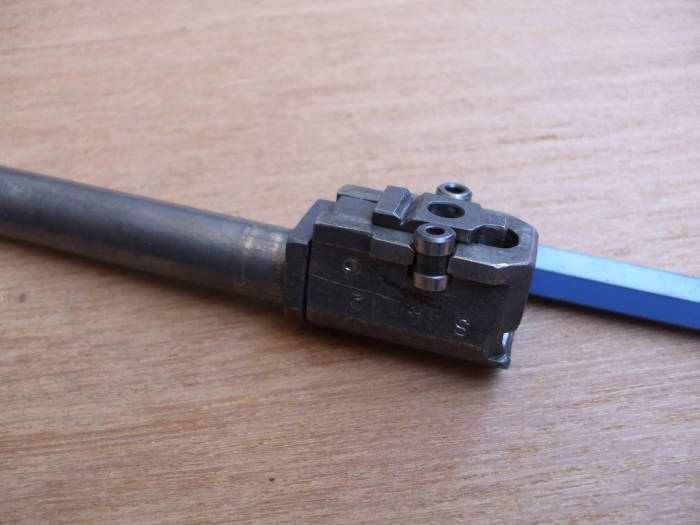
Here the cam has been moved as far forward as the roller cam retaining pin allows it to travel.

The rollers can retract and unlock the barrel, but the rollers cannot be removed.

CZ-52 rollers, roller cam fully forward.

Drift the roller cam retaining pin out of place with a 1/16" punch.

You do not need to remove it, just move it far enough that the roller cam can travel farther forward and allow the rollers to be removed.


ASIN: B002Q86RLK

ASIN: B004SY07HU
CZ-52 roller cam retaining pin drifted out of place.

With the retaining pin out of the way, the roller cam can be moved further forward than normal.

This allows the rollers to be moved toward the barrel centerline and removed for replacement.

5. Remove the old firing pin, firing pin retaining plunger and spring (if upgrading the firing pin)

Here is a view of where you will be working. The rear of the firing pin protrudes from the rear face within the slide.

Just forward of that you see the shiny end of the half-cylindrical retaining plunger.

Depress that retaining plunger with a 1/8" or 3/16" punch while holding the slide with the muzzle end up.

CZ-52 slide assembly.
CZ-52 firing pin being removed from the slide.

The firing pin should drop out. You will probably need to work the retaining plunger in and out, especially if your pistol is newly purchased and has been packed with cosmoline.

The last picture above shows the firing pin worked part-way loose.

Once the firing pin is completely out, the plunger will drop free.

You could use a pair of pliers to gently pull the firing pin loose if needed.

They don't have to be Czechoslovakian pliers like these, but that would be most appropriate!

Czechoslovakian pliers.

Here are the original firing pin (at right) and firing pin retainer and spring (at left) in their approximate relative positions.

Original firing pin and retaining plunger.
New firing pin and retaining plunger.

Here is the upgrade package.

The firing pin and its return spring are discussed on the page about firing pins. The addition of the return spring is part of the design changes that prevent firing pin breakage.

Below the new firing pin is the new detent and detent spring.

If you have lost track of which is which, refer to the two pictures below.

Original and new firing pin and retaining plunger for the CZ-52 pistol.

6. Carefully clean the firing pin's chamber within the slide

If the original firing pin's tip broke off, it usually ends up within the cylindrical chamber in the slide in which the firing pin rests. The tip may become lodged in Cosmoline and then jam the replacement pin in place, causing slam fires. Thorough cleaning with plenty of solvent should float out residual Cosmoline and lift any debris.

Thoroughly clean this cylindrical chamber. Hoppe's solvent might be adequate, but brake cleaner will do a better job of cleaning. Spray the brake cleaner into that cylindrical chamber from the rear, using the thin plastic tube included with the spray can. Then clean the chamber with a cotton swab.

Also, in some later designs the firing pin's chamber is only roughly cylindrical — it may have been drilled out to a roughly conical cross-section with stepped drill bits at varying depths. Burrs on those steps can catch the new firing pin return spring and jam the pin in place, causing slam fires. The swab's cotton threads will catch on and alert you to any burrs that need to be removed. Remove burrs if needed by clamping a drill bit in a vise and twisting the slide onto the drill bit. Do not use a power drill for this operation.

7. Remove the firing pin return spring and drop the new firing pin into place

It should fall freely into the firing pin hole, with the tip of the firing pin protruding from the breech face as seen in the first picture here. If the firing pin does not drop into the hole, do not use force!

On a few guns, we have encountered firing pin holes machined grossly out of specifications, or where a burr forms on the firing pin retaining plunger hole (from dry firing the pistol).

The firing pin hole may need a light clean up and/or any burrs on the retaining plunger hole may need to be removed before the firing pin can drop into the gun.

To do that, clamp a 7/32" drill bit in a vise. Twist the slide onto the drill bit until the hole is cleaned up. You should remove only a small amount of material from the slide, usually from a single high spot in the firing pin hole. (This is part of your extractor!) You wish to only slightly clean up the firing pin hole. Only the portion of the firing pin hole near the rear of the slide needs to be the full 7/32" diameter, so there is no need to drill deeply into the hole. Do not use a power drill for this operation. A little cutting oil on the drill bit will help this operation.

New firing pin test fit in slide.

Above you see the firing pin tip more clearly, with a white cotton swab providing contrast.

The firing pin hole on the CZ-52 should be 0.219-0.220". A 7/32" drill is 0.2185". The factory firing pin diameter is 0.217", with a few in the range of 0.215-0.216". The largest diameter on the Harrington Products firing pin is 0.213-0.215", tapering to smaller diameters towards the firing pin nose.

Verify that the firing pin freely slides back and forth within its cylindrical chamber in the slide.

Remove the firing pin when that test is complete.

Here you see the slide from the rear, ready for the installation of the firing pin upgrade kit.

Slide ready for new firing pin.
Slide prepared to drift out extractor pin.

8. Replace the extractor (if upgrading or modifying the extractor)

The extractor pin passes vertically through the slide, just behind the ejector port and passing roughly through the center of the extractor.

Extractor being removed from slide.

Drift the pin out with a 1/16" or 3/32" punch.

The pin has been removed and the extractor and extractor spring can be removed. This is another area where you will find plenty of cosmoline in a CZ-52 that has been in storage.

Extractor being removed from slide.

At left is an original Česká Zbrojovka extractor.

At right is a Harrington Products redesigned extractor ready for installation.

Old and new or modified extractor.

The new extractor is installed and the pin replaced in the opposite order.

Be careful when drifting the pin back into place!

You might want to drive it in from the bottom side, to avoid any chance of the pin scarring the slide exterior.

If you lose the extractor pin, a 3/32" by 1/2" roll pin will work as a replacement.

9. Twist the firing pin return spring onto the firing pin, and drop the firing pin into the slide

You should be able to press on the end of the firing pin with a punch and see the firing pin protrude from the breech face. When you release pressure on the firing pin it should return freely.

Here you see this being done before replacing the extractor, so you see a "cut-away" effect of the pin and its spring within the slide.

Slide ready for new firing pin.

However, this test should be done with the extractor in place.

On some guns, the firing pin return spring will drag on the square protrusion at the rear of the extractor, at the bottom of the firing pin hole, and the firing pin will not move freely. This needs to be corrected before the pistol is used.

You could upgrade your extractor, as shown above, or you could remove and modify your existing extractor as shown below.

Drawing of extractor showing where to create radius.

Remove the extractor from the slide. Clamp the extractor in a padded vise, with leather or brass inserts on jaws. Using a small circular file, create a radius on the extractor as shown in the diagram below. A colored magic marker or machinist's dye can be used to mark the extractor to determine where the firing pin drags. Remove a small amount of material only from those spots.

Drop the new firing pin and spring out of the slide.

10. Drop the firing pin retaining detent and spring into the firing pin retaining hole in the slide

Make certain the detent drops in freely, without using force.

Here you see the detent and spring next to the hole before being dropped in.

Firing pin detent being inserted into slide.
Firing pin detent inserted into slide.

Make certain the detent drops in freely, without using force. Compress the detent up and down with a punch to make certain it moves freely in the hole. Remove any burrs on the slide which may prevent free movement of the detent.

11. Holding the detent down with a small punch, insert the firing pin backwards into the slide for a small distance, making sure that the thickest end of the firing pin will clear the detent.

If firing pin cannot move past the detent, clip one-quarter of a turn off the end of the detent spring and try again. The detent spring should be as strong as possible to retain the firing pin, but not so long that a completely compressed detent spring will not allow the firing pin past the detent. Remove the firing pin from the slide.

Firing pin test insertion into slide.
Firing pin final insertion into slide.

12. Compress the detent and install the firing pin in the correct direction into the slide

You will need to take a slender awl or scribe to press down on the detent as the spring moves past. A Starrett machinist scribe is ideal for this task. In a pinch a bent safety pin will also work. A punch is typically too fat to do this job.


ASIN: B000E60N84

ASIN: B000E60N98

The flat portion of the firing pin should face the detent. There should be an audible "click" as the detent engages the firing pin.

Test the firing pin by pressing on its rear end with a punch. The tip of the firing pin should protrude from the breech face when pressed with the punch, and the firing pin should return on its own when the pressure is released.

Firing pin final insertion into slide.

To remove the firing pin, take a long awl, scribe, or 1/16" punch and press in on the detent through the hole drilled in the firing pin. Push the firing pin past the detent using an awl or scribe. If the firing pin is stubborn, a pair of needle nosed pliers can be used once the detent releases the firing pin.

13. Final Safety Check

Make absolutely certain that the firing pin is free to move, and that it does not protrude rigidly from the bolt face. A rigidly protruding firing pin will cause a slam fire: the weapon will fire as soon as the slide is closed, and will continue to fire as rapidly as the slide can cycle until the magazine is empty.

You should see what is shown below. The tip of the firing pin's nose may be barely visible, but it is well below the surface of the bolt face.

Correctly assembled firing pin and slide.  The tip of the firing pin is well below the surface of the bolt face.

You should not see what is shown below. The firing pin is protruding from the bolt face, and the weapon will fire uncontrollably if loaded.

If you see this condition, immediately refer to the above steps to remove the firing pin and then thoroughly clean (and, if necessary, de-burr) the firing pin's cylindrical chamber.

Incorrectly assembled firing pin and slide.  This is an extremely dangerous condition, the weapon will uncontrollably fire.